Deploying Medusa Service Behind a Reverse Proxy on Ubuntu 22.04
Last Updated: May 26, 2023
This guide will walk you through the process of deploying Medusa behind a reverse proxy on Ubuntu 22.04 using either Nginx or a Cloudflared tunnel as our reverse proxy.
This is Part 3 of a series of guides on how to deploy Medusa.
At the end of the last guide, we had a working Medusa backend running on port 9000. However, we can only connect to this backend via HTTP, and not via HTTPS. This is fine for testing, and it is also fine if we only ever intend to connect to the backend within a local private network. The latter might be the case if, for instance, our storefront app is a SvelteKit or Remix app that is on the same server or same private network and that only ever makes calls to our Medusa backend using server-side code.
However, many storefront apps are built from the official NextJS starter app, which connects to the Medusa server from the client (the browser). In these cases, we need our Medusa server to be available publicly on the Internet. We may also need it to be available publicly even if we are only making calls to Medusa from our app using server-side code. For instance, we might want to deploy our storefront app on a different cloud service provider (e.g., Vercel, Cloudflare Pages) than the cloud provider we use for our Medusa backend.
In these cases, we need to make our Medusa server available publicly on the Internet, and we need to use TLS. This is a basic requirement for processing payments and collecting any user data virtually everywhere in the world.
We do this not by altering Medusa itself in any way, but instead by putting Medusa behind a reverse proxy. A reverse proxy is a server that sits in front of our Medusa server and forwards requests to it. The reverse proxy is the only server that is publicly available on the Internet. The reverse proxy can also handle things like SSL certificates, which are required for HTTPS connections.
Nginx
Nginx is an extremely popular open source web server. It can do many, many things, but our use case in this guide will be limited to using it as a simple HTTPS server that routes traffic to and from our Medusa backend. It will be installed on the same server as our Medusa backend and communicate with it on localhost only.
Before you begin installing and configuring Nginx, take a look at your security group. Make sure you enable incoming traffic on port 80 (HTTP) and port 443 (HTTPS). If you are using AWS, you can do this by editing your security group and adding these two rules:
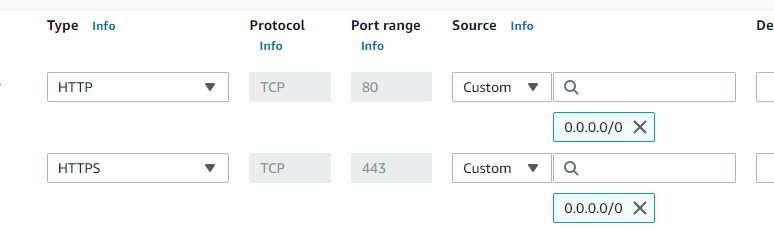
Later, you can remove the line for port 80 if you want to force all traffic to go through HTTPS. But leave 80 open for now so that we can easily generate our certificate using Certbot.
Install Nginx
The default nginx from the official Ubuntu repos is fine for our purposes.
sudo apt install nginx
sudo systemctl enable nginx
Install Certbot
Certbot is a command line tool that will help us generate a free SSL certificate from Let’s Encrypt. We will use this certificate to enable HTTPS on our Nginx server.
sudo apt install certbot python3-certbot-nginxVerify Your DNS Settings
To generate a certificate, you will need an FQDN. This is the fully qualified domain name that you will use to access your Medusa server.
Ensure that in the DNS settings for your domain, you have an A record pointing to the IP address of your server. The exact steps for doing this will vary based on who the DNS provider is for your domain.
Generate a Certificate
Certbot greatly simplifies the process for generating a certificate and setting up SSL versus how things used to be.
Certificates tell client browsers that the the server it is communicating with is, in fact, who it claims to be. Therefore, before granting a certificate, Certbot verifies in some way that this is the case. This is called the “challenge.”
There are several methods you can use to verify your domain. The easiest is to use the --nginx flag, which will automatically configure Nginx to serve the challenge. This is the method we will use in this guide.
If this is your first time using certbot, try adding the --dry-run flag to the command below. This will run certbot in test mode, which will not generate a real certificate. This is a good way to make sure everything is working before you generate a real certificate. If you fail to generate a certificate several times in a row, Let’s Encrypt will temporarily block you from generating a certificate for a while. So it’s a good idea to test things out first using –dry-run, and then remove it to generate your real certificate only after you know the test will pass.
sudo certbot --nginx certonly -d example.com --dry-run Replace example.com with your own domain name. If everything works, generate your real certificate by removing the --dry-run flag. Tell certbot to set up Nginx use the certificate by removing the certonly flag.
sudo certbot --nginx -d example.com If everything went well, you can now disable incoming traffic on port 80 if you want.
Configure Nginx
We now need to adjust our Nginx configuration to act as a proxy. By default, Nginx is set up to act a simple web server. Let’s change that.
First, make a backup of the default Nginx configuration file. Then, open it in your favorite text editor.
sudo cp /etc/nginx/nginx.conf /etc/nginx/nginx.conf.bak
sudo nano /etc/nginx/nginx.conf
Replace the default nginx.conf with the following, being sure to replace example.com with your own FQDN that you used to generate your certificate.
user www-data;
worker_processes auto;
pid /run/nginx.pid;
include /etc/nginx/modules-enabled/*.conf;

events {
   # You can adjust the number of worker processes based on the number of CPU cores you have
   worker_connections 768;
}

http {
   # Basic Settings
   sendfile on;
   tcp_nopush on;
   types_hash_max_size 2048;
   server_tokens off;

   include /etc/nginx/mime.types;
   default_type application/octet-stream;

   # SSL Settings
   ssl_protocols TLSv1 TLSv1.1 TLSv1.2 TLSv1.3; # Dropping SSLv3, ref: POODLE
   ssl_prefer_server_ciphers on;

   # Logging Settings
   access_log /var/log/nginx/access.log;
   error_log /var/log/nginx/error.log;

   # Gzip Settings
   gzip off;

   server {

      listen [::]:443 ssl;
      listen 443 ssl;

      server_name example.com;

      ssl_certificate /etc/letsencrypt/live/example.com/fullchain.pem;
      ssl_certificate_key /etc/letsencrypt/live/example.com/privkey.pem;

      include /etc/letsencrypt/options-ssl-nginx.conf;
      ssl_dhparam /etc/letsencrypt/ssl-dhparams.pem;

      location / {
         proxy_set_header X-Forwarded-For $proxy_add_x_forwarded_for;
         proxy_set_header Host $host;
         proxy_pass http://127.0.0.1:9000;
         proxy_http_version 1.1;
         proxy_cache_bypass $http_upgrade;
         proxy_set_header Upgrade $http_upgrade;
         proxy_set_header Connection "upgrade";
      }
   }
}
Let’s now test the configuration file to make sure we didn’t make any mistakes. Then, restart the service.
sudo nginx -t
sudo systemctl restart nginx
Taking Nginx Further
This configuration will proxy every location requested from our FQDN to our Medusa backend running on port 9000.
Part of the strength of Nginx is its extreme flexibility. In terms of routing and authenticating traffic, you can do almost anything with it.
From the example above, you can probably see that if you wanted to, you could get more granular and set up multiple FQDNs. For instance, you could generate 3 different certificates for 3 subdomains:
- store-api.example.com
- admin-api.example.com
- admin-app.example.com
You could then set up 3 different server blocks in your Nginx configuration, each with its own certificate and proxying to a different path. The primary benefit of this would be the ability to set additional security on some of the subdomains. For instance, you could set up a firewall rule that only allows traffic to the admin-api subdomain from a specific IP address. This would prevent anyone from accessing your admin API from anywhere other than your office or home IP address. As another example, you could add Basic Authentication to the admin-app subdomain, which would require a username and password to access the admin app. Or, you could require an API key or even oauth. It’s all up to you.
Cloudflared
If you are already using Cloudflare, using a cloudflared tunnel is a great way to expose your Medusa server to the Internet. Cloudflare will automatically generate an SSL certificate for the tunnel endpoint. You do not need to open port 80 or 443 on your server if you go this route. Cloudflared will create a one-way tunnel to Cloudflare, and Cloudflare will act as a reverse proxy for your backend much like Nginx did in the example above.
Once you have a tunnel set up, you can use Cloudflare Access to add an extra layer of security to your server.
Install Cloudflared
There are a few different ways to install cloudflared. I tend to prefer installing from the Cloudflare repo so that I don’t have to manage a separate upgrade process.
# Add cloudflare gpg key
sudo mkdir -p --mode=0755 /usr/share/keyrings
curl -fsSL https://pkg.cloudflare.com/cloudflare-main.gpg | sudo tee /usr/share/keyrings/cloudflare-main.gpg > /dev/null

# Add this repo to your apt repositories
echo 'deb [signed-by=/usr/share/keyrings/cloudflare-main.gpg] https://pkg.cloudflare.com/cloudflared jammy main' | sudo tee /etc/apt/sources.list.d/cloudflared.list

# install cloudflared
sudo apt-get update && sudo apt-get install cloudflared
Set Up the Tunnel Service
Installing the cloudflared package above installs all the tools you will need, but it does not create a tunnel service for you. It needs more information for that.
If you are already familiar with cloudflared, you may want to use the command line for this next part. To avoid confusion, I won’t cover how to do that here.
For this guide, we will use the GUI tool on the Cloudflare web site, which will give use a command to copy and paste on our server command line to set up our tunnel.
From your main Cloudflare dashboard, click on “Zero Trust,” then “Access,” then “Tunnels.” Click the “Create Tunnel” button.
Give your new tunnel a user-friendly name. It can be anything. Then, click “Save Tunnel.”
Next, you’ll be asked to configure your tunnel. Select “Debian,” then “64-bit” (or “arm64-bit” if you decided to create an arm-based EC2 instance).
You should now see a command on the right that looks something like this, except it will be a different (and longer) random string of characters:
sudo cloudflared service install eyJhIjoigyODU0OWViOWRiZaiJ9...Copy and paste this command into your server command line. After you do this, your server will be connected to Cloudflare, and you can move to the next step.
Add a Public Hostname
Now that your server is connected to Cloudflare, you are asked on the next screen to add a public hostname. This hostname must be part of a domain that is already added to your Cloudflare account. Cloudflare adds the A record for you automatically, so make sure there is NOT currently an A record for the domain/subdomain you want to use.
You are also asked for the URL of the service this hostname should proxy to. Here, you should enter the local name from the perspective of the server end of the tunnel. For our Medusa backend, that is http://localhost:9000.
After entering these, click “Save Tunnel.” You should now be able to access your server on the Internet using the hostname you just entered. If you don’t see the change take effect right away, allow some time for the DNS records to propagate.
Adding Security Using Cloudflare Access
If you want to add an extra layer of security to your server, you can use Cloudflare Access. You can then set up rules to allow or deny access based on the user’s email address, IP address, or other criteria.
On the Cloudflare Zero Access menu, under “Access,” select “Applications.” Click the “Add an Application” button. Select “Self-Hosted.”
Add a user-friendly name for the application. This can be anything. You can use the defaults for everything else, scroll down, and click “Next.”
Under the Policies tab, you can explore and configure access however you like. For instance, you can add a rule that only allows access to the backend from a specific IP address. Or, you can add a rule that requires the user to log in with their Google account. Or, you can add a rule that requires the user to log in with their email address and a password. There are many options here.
One wrinkle is that we may want our storefront application to be able to access from anywhere programmatically. We can set this up using “Service Auth.”
Under Access, select Service Auth and generate a new Service Token. Be sure to copy both parts of the token and save it somewhere. You will need it later.
Now, go back to the Applications tab and configure application you just created. Under Policies, “Service Auth,” add a policy.
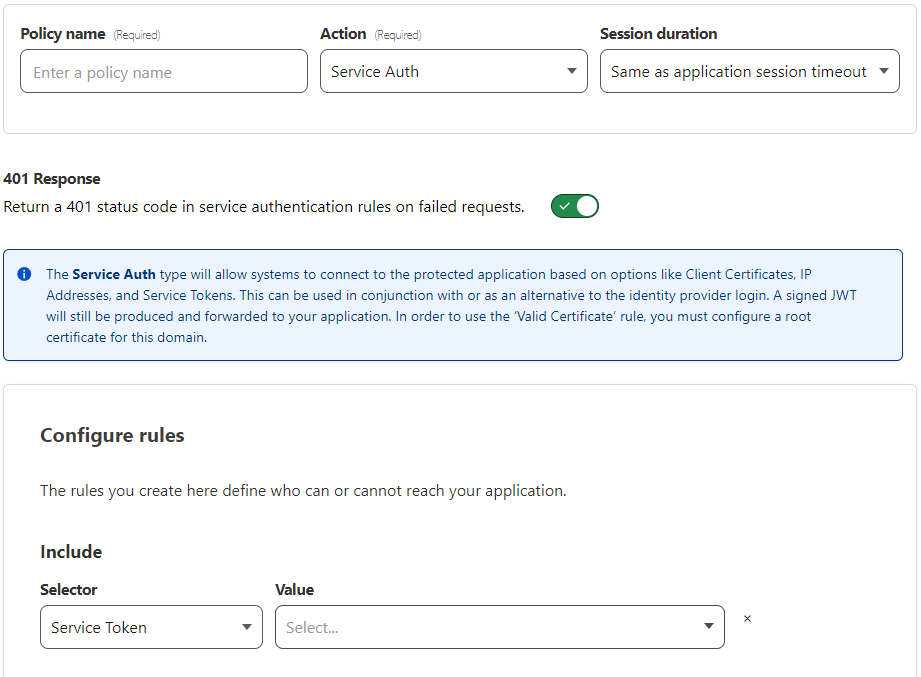
For the Value of the service token, select the service token you just created. If you plan to add other policies, like allowing access from a certain IP, or with a login, set the option to return a 401 response to Off.
If your storefront app includes the service token headers in all of its requests to the backend, it can access the backend from anywhere while still denying access to others.
Up next
- Part 4: Creating a custom docker image for your setup